Ahad, Februari 27, 2011

Sabtu, Februari 19, 2011

How to Make a Star-Shaped Book

Making a star-shaped book is easier than you may think. See how to create a star-shaped book that can be used as a gift or as a memory keepsake.

http://video.about.com/familycrafts/Star-Shaped-Book.htm?r=facebook

Transcript: How to Make a Star-Shaped Book

Hi, I'm Holly Deambrosi for About.com. Did you know you can make a book that opens up into a star shape? This is a wonderful project that you can make with a child to keep memories in or give as a gift.

Supplies for Creating a Star-Shaped Book

This project will be faster and easier for a child to make if you prepare the materials ahead of time.
  • 2 pieces of thin cardboard cut 4" square
  • 2 pieces of decorative paper cut 5 1/2" square
  • 5 cardstock rectangles cut to 4 x 8" and folded exactly in half
  • 5 patterned paper rectangles that are 6 1/2 x 3 1/2". Fold each exactly in half.
  • Glue stick
  • Double sided tape
  • 2 pieces of ribbon, 10" long each

Instructions for Making a Star-Shaped Book

Glue the two pieces of cardboard onto the two 5 1/2" squares of paper. Cut the corners diagonally off the paper and fold the sides down and glue them to the cardboard.

Take a large rectangle and put double-sided tape or glue on the inside edge of each end and put a smaller rectangle inside with the end edges lining up with those of the larger rectangle. Make sure the smaller rectangle is centered horizontally on the larger rectangle and that there is a space in the middle between the two rectangles.

Repeat this process until all the smaller rectangles are attached to the larger ones. Once they are ready, glue all 5 folded rectangles together with the outsides attaching to one another. We'll do this by putting glue on the outside of one and, lining up the edges with another one, press them firmly together. Repeat this until all 5 are attached in a row, leaving the ends open for the cover.

Now glue the end of a piece of ribbon to the inside of each piece of cardboard. Glue the cardboard pieces to the ends of the star book so that the ribbon is between the cover and the book paper.

Let your child draw pictures or put stickers in the book. You may want to add some photos of him that can be embellished to make a mini scrapbook.

You can tie the book closed, or open it into a star form and tie the ribbon to hold the shape.

For a fun variation, use different colored or patterned paper for each fold of the star. When using a variety of patterns, stay with one color scheme for unity.

Thanks for watching! You can learn more by visiting us on the web at About.com.

Jumaat, Februari 18, 2011

Easy Animal Costumes for Kids

Dalmation Puppy Animal Costumes for Kids
Cat
Bunny
Sheep
Turtle
Cow
Tiger
Ladybug
Butterfly

Any animal costume can be made with some basics like a sweat shirt, sweat pants and or leggings, a pair of socks for ears and tail, headband or ski cap to hold ears, and some face paint.

Also look at our ANIMAL BODY PARTS section for alternatives to making animal sections.

DALMATION PUPPY

MATERIALS:
White Sweat Shirt
White Sweat Pants
Black Felt
White craft Fur
Scissors
Fabric glue
Thread and needle or sewing machine
White ski cap
Face makeup in white and black
2 pairs of socks
Cotton Batting

  • Cut out irregular size spots from the black felt
  • Tack or glue them to the sweats
  • Cut the white craft fur in a wide strip and lay flat.
  • Lay cotton batting on material.
  • Fold fur over and sew edges.
  • Tack tail onto back of sweat pants. (Can also use a white sweat sock stuffed with cotton batting.
  • Apply white face makeup to child’s face.
  • Add black face makeup for dalmation spots.
  • Stuff two white socks with batting. Add a few black pieces of felt for spots. Or- cut out two ears from white fur or black felt.
  • Tack ears to either side of white ski cap.
  • Have child wear one pair of socks on hands and one pair on feet.

USE THIS PATTERN TO MAKE ANY TYPE OF DOG COSTUME.
Just use brown, or black or what ever colors you want for your dog.

CAT

MATERIALS:
Brown, tan, gold, white, or black sweatshirt and sweat pants or leggings
Craft fur in color matching sweats
Fabric glue or hot hot glue gun
Needle and thread
Felt in color matching sweats
Plastic headband or ski cap in matching color
Scissors
2 pairs of socks in color matching sweats
Wide felt marking pen
Face Paint or makeup

  • Use marker to draw stripes on sweats.
  • See our pattern for cat ears.
  • See instructions for making the ears using felt and craft fur.
  • Cut small oval of fur from craft fur for the tummy area and glue on.
  • Make cuffs and neck collar from craft fur. Use the cuffs, and neck ribbing on the sweatshirt as a guide for how wide and long you need to cut fur strips.
  • Attach strips to sweats using glue.
  • Cut a long tail from either felt or fur, stuff with cotton batting and sew it closed (see animal parts section for instructions).
  • Attach tail to back of pants with glue or stitching.
  • Have child wear one pair of socks on hand and 1 pair on feet (see animal parts section for instructions on more elaborate paws).
  • Apply makeup to face. Eyeliner is great for making whiskers.

BUNNY

MATERIALS:
White, Brown or Pink Sweatshirt, and Sweat Pants or matched Legging
Craft fur
Pink Felt
2 popsicle sticks
Powder Puff or Pom Pom
Fabric tape or hot glue gun
Needle and thread
Plastic headband
Ski cap to match sweats
Plastic Carrot or real carrot

  • Glue large cotton ball or pom pom to back of pants for a tail.
  • Use our pattern for bunny ears and see our animal parts section for construction. You will be cutting a pattern out of 2 pieces of craft fur and 1 small pattern of pink felt for inside of ears. Glue a popsicle stick to center of inside of fur patterns to help hold ears up. Sew pieces together and hot glue or stitch to headband. Floppy ears can just be attached to sides of a ski cap.
  • Cut a piece of fur for tummy and glue to shirt.
  • Carry a carrot.

SHEEP

MATERIALS:
White Sweatshirt (hooded or not) and Sweat pants
White ski cap if shirt is not hooded
Cotton batting or stuffing from a pillow
White or black felt for ears
Fabric glue or hot glue gun
Needle and thread
2 pairs of white or black socks

  • Apply glue in strips up and down the sweat suit.

You could also use double sided tape for this.

  • Attach cotton batting in clumps by pressing into glue or onto tape.
  • For the ears, see our pattern and animal parts instructions or cut 2 triangles for either black or white felt and attach to hood or to a white ski cap.
  • Have child wear 1 pair of socks on hands and 1 pair on feet. Or follow our animal hooves instructions to make your own.
  • Apply white face paint or makeup. Black for nose.

TURTLE

MATERIALS:
Green Sweatshirt and Sweat pants or Leggings
3 pieces of green or brown poster board or craft foam board
Scissors
Craft Paint or thick markers
Hot glue
Green ski cap or hat
Face paint or makeup

  • Cut one piece of poster board into a large shell.
  • Trace out line of that shell and make a second one from the 2 nd piece of board.
  • Draw large wobbly circles on the 2 shell pieces.
  • Go over outlines with markers or paint to accentuate.
  • Cut 2 long, fairly thick strips ( 1-2 inches wide) the full length of the 3 rd board.
  • Using hot glue, attach the strips to the top of the inside of the back shell. Run the strips over the child’s shoulders as straps and attach to the front shell piece. Allowing enough room for child to move comfortably.
  • Apply green make up to face along with several red and yellow stripes to neck as turtles have.
  • Put on green cap.

COW

MATERIALS:
White Sweatshirt and Sweat Pants or Leggings
Black or brown fabric/felt for cow spots
Short piece of rope or 10-12 strands of black yarn, braided or a piece of rope
Dog Collar or old belt
Bell
2 pairs of black socks
Hot glue
Needle and thread

  • Cut out irregular splotches from your brown or black felt.
  • Sew or hot glue splotches of felt onto the sweat pants and bottoms.
  • Make a tail by unraveling a thick piece of rope and pinning or gluing to the back of the pants. If you use yarn, be sure to leave a section unbraided toward the end of the tail.
  • For the ears, see our patterns and ear making process in the animal parts section OR cut 2 large triangles from the felt.
  • Either sew or glue these ears onto the side of a ski cap or onto a headband.
  • Use a dog collar or old belt and attach a cow bell to it and put it around child’s neck.
  • Put one pair of socks on hands and one pair on feet. Or follow our animal hooves instructions to make your own.

TIGER

MATERIALS:
Yellow or Orange Sweat Suit
See Animal Parts section for wonderful lion or tiger head
See
animal parts section for wonderful ears
Black or brown fabric paint
Yellow or orange felt
2 pair of black socks

  • Paint black or brown stripes on the sweat suit.
  • For ears cut two triangles from felt.
  • Either hot glue or sew ears onto cap, hood or our animal parts section head.
  • Cut a long tail from the remaining felt and attach it to back of pants.
  • Again, check out our animal parts Section for tails
  • Have child wear 1 pair of socks on hands and 1 pair of socks on feet.
  • Can add claws to socks if like ( see Animal Parts Section)

LADYBUG

MATERIALS:
Black Sweat Shirt
Black Leggings
Red Ski Cap
2 pairs of black socks
2 pipe cleaners
2 red pom poms
Red craft foam or poster board
Black poster board
42” black laces
glue and hot glue
needle and thread

  • Attach red pom poms to pipe cleaners using hot glue
  • Attach your pipe cleaner antennae to you red hat by pushing pipe cleaner through material and using a few stitches to hold it. Or- wrap chenille sticks on to a plastic headband for antennas.
  • Use our pattern for the wings and cut it out. We suggest using craft foam – red.
  • Attach circles of black dots cut from your black poster board with glue.
  • At the top of wings near shoulders on either side of the head. Punch 2 holes.
  • Feed shoe laces through one hole and then the next. The 2 loose ends now will go around the shoulders, pass back through the holes and be tied off in big knots so they won’t slip back through the holes. ( be sure to allow enough room to make your child comfortable while wearing the wings.

BUTTERFLY

MATERIALS:
Black Sweat Shirt or Jersey
Black Leggings
2 Black Chenille sticks
Black Headband- plastic or cloth covered
Poster Board or Craft Foam – any color but black
Craft Paints- use many colors- fluorescents look great
Glitter
Craft glue
2 Pairs of black socks
1 Pair of long boot laces
Color pom poms for antennas (optional)

  • Fold sheet of Poster board in half.
  • Using the Butterfly wing template as a guide, draw out wings on one side.
  • Cut out the design.
  • Open the folded Poster board and you will have a set of wings that match.
  • Paint a black border around edges of wings.
  • Use fluorescent paints to paint the rest of the wings with different shapes and patterns.
  • Sprinkle glitter around the edges of the wings
  • Poke a hole at the top inside on each side of the center seam
  • Poke a hole at the bottom on each side of the center seam
  • Run boot laces through and criss cross over the child’s body and tie.
  • Wrap chenille sticks onto headband for antennas (can put black pom poms or cotton balls on ends if desire).
  • Put one pair of black socks on child’s hands, and another pair on feet.
Source : http://www.fleecefarm.com/easy_animal_costumes.htm

Isnin, Februari 14, 2011

Bahan Bantu Mengajar 5

Stiker

Lembaran kerja

Counting butterflies

Counting Bees

Hanya RM10 sahaja.
Hubungi fauziah.arahim@gmail.com
Telefon : 019 755 6032

Cara Muat Turun Bahan Softcopy

Terima kasih kepada semua yang telah membeli bahan-bahan yang telah saya hasilkan. Bagi anda yang masih baru dalam dunia komputer dan mendapati sukar untuk memuat turun bahan-bahan tersebut, di sini saya akan memberikan panduan bagaimana anda boleh melakukan operasi ini dengan mudah.

Setelah menerima kod untuk memuat turun file, sila klik pautan tersebut. Anda pasti akan menemukan paparan seperti di bawah.

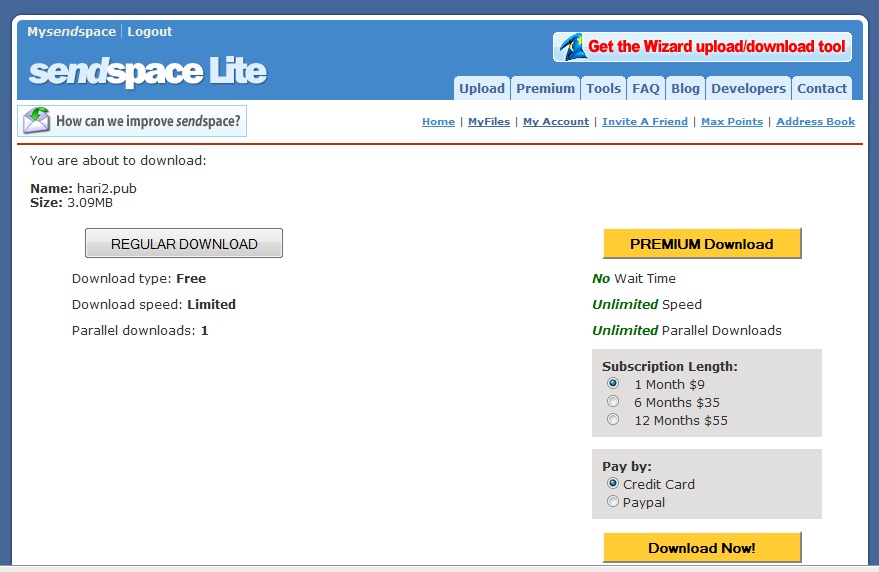
Klik pada ikon Regular Download. Kemudian paparan di tetingkap monitor anda akan menunjukkan paparan seperti di bawah.

Seret paparan anda hingga ke bahagian paling bawah di mana anda akan melihat anak panah berwarna merah yang akan berkelip-kelip. Klik pada bahagian Download dan anda akan ditanya sama ada mahu membuka terus dari program atau menyimpannya ke dalam komputer. Sila pilih untuk menyimpan bahan ke dalam komputer supaya memudahkan anda membuat penambahbaikan pada bahan tersebut.

Selamat mencuba dan berjaya...


Bahan Bantu Mengajar 4

Kad kvkvk

Kad kvvk

Kad imbasan buah-buahan

Kad imbasan serangga

Bahan ini boleh dimuaturun. Hanya RM10 sahaja.
Hubungi : fauziah.arahim@gmail.com
Telefon : 019 755 6032

Rabu, Februari 09, 2011

Bahan Bantu Mengajar 3

Token Board

Kad imbasan haiwan mengandungi 91 halaman = 182 jenis haiwan

Carta Ejaan

Kad imbasan bunga mengandungi 63 halaman = 126 bunga

Bahan ini boleh dimuaturun. Hanya RM10 sahaja.
Hubungi : fauziah.arahim@gmail.com
Telefon : 019 755 6032

Bahan Bacaan 2

Kad insentif

Kad ucapan bertatasusila

Cerita Rama-rama

Cerita Hujan

Pantun

Terdapat 9 siri file untuk dimuaturun termasuk kad ruang pembelajaran
Hanya RM10 sahaja
Email saya : fauziah.arahim@gmail.com
Telefon : 019 755 6032

Rabu, Februari 02, 2011

Bahan Bacaan 1

Keluarga saya

Menanam Bunga

Main Bola

Baju

Buku

Assalamualaikum
Bahan bacaan awal ni hanya RM10 sahaja.
Boleh dimuat turun dan diubahsuai
Hubungi saya di talian 019 755 6032 atau email fauziah.arahim@gmail.com untuk tempahan

Pusat Pembelajaran

Worksheets